If you’re a designer who enjoys using Typekit web fonts, you may also want to use them with your WordPress sites. Fortunately it is fairly easy to do so with some CSS knowledge and a WordPress plugin.
Create your kit
First you’ll want to create your kit on the Typekit website. For the sake of this guide, we’ll assume you’ve already done this. Try reading this if you’ve never created a kit before.
Add the embed code to your site
One you have your kit ready, you’ll need to add the kit’s embed code to the <head> of your WordPress site.
The embed code will look something like this, and can be found in the Kit Editor.
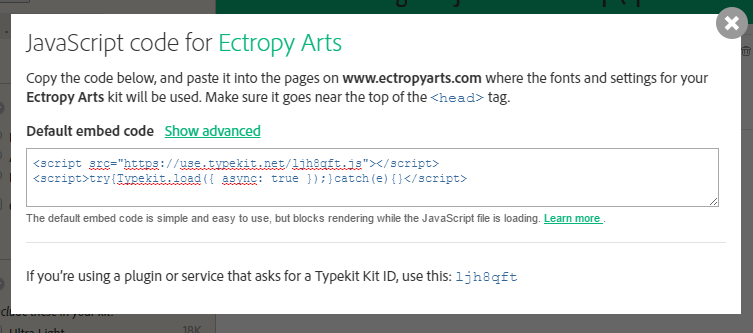
Kits are domain-specific, so this kit for ectropyarts.com will only work on this site.
Typekit’s documentation suggests directly editing the header.php file to add the embed code, but I’d recommend against this. You’ll lose your changes if you decide to apply an update to your theme or if you change your theme. Instead, it’s better to use a plugin or a child theme, as these won’t be affected by a theme update. We’ll show you how to use a plugin.
Go to the WordPress plugin directory and find a plugin that allows you to edit the <head> of your page. If you’d like, you can use a Typekit specific plugin like “Typekit Fonts for WordPress”. Still, any plugin that allows editing of your site’s <head> will work. It’s good to pick one that has many users and has been updated recently. Install and activate whatever plugin you choose to use.
Next, go to the plugin’s interface. If you’re using the plugin mentioned above, its interface can be found under “Settings” > “Typekit Fonts” on the sidebar.
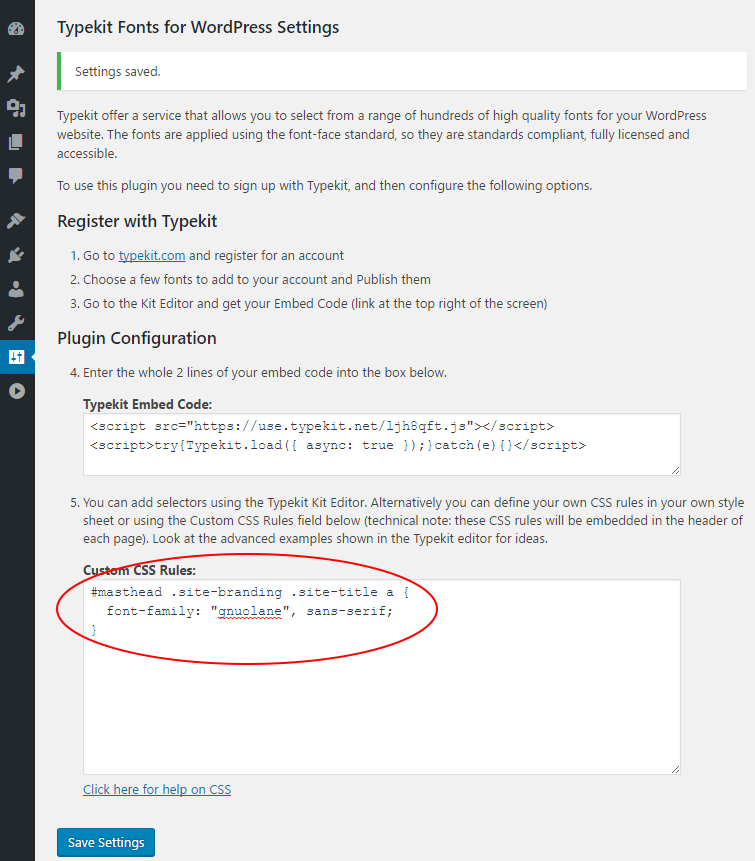
Take the embed code for your kit, and paste it into the appropriate place in plugin. For plugins that edit the <head> directly, anywhere in the <head> should work. If you’re using “Typekit fonts for WordPress” you’ll want to paste the embed code into the box labeled “Typekit Embed Code” (see below).

Once you’ve added the embed code, save your changes.
Apply the web font to some text using CSS
Now that you have successfully added the embed code to your site, you’ll want to specify which text should use your web font(s). You’ll use CSS for this.
Let’s say you wanted to use a shotgun approach and make all text in the <body> of your page use the Gnuolane web font. You could do that by adding CSS to your <head> like this.
body {
    font-family: "gnuolane", sans-serif;
}
The text between the <body> tags will be displayed in the Gnuolane font, unless the font fails to load, in which case it will fallback to any sans-serif font that the user’s browser decides to use. Don’t forget, the web font must be one that you included in your kit.
You could also try applying the font to a few specific tags, for example all header tags:
h1, h2, h3, h4, h5 {
    font-family: "gnuolane", sans-serif;
}
Or a class:
.site-title {
    font-family: "gnuolane", sans-serif;
}
If you’re having trouble getting the font to show up, you might need to use CSS selectors with a high level of specificity in order to override your theme’s built-in font choices:
#masthead .site-branding .site-title a {
    font-family: "gnuolane", sans-serif;
}
This combination of CSS selectors has a specificity of 0121 (0 inline styles, 1 id, 2 classes, and 1 html element), which is specific enough to override the CSS that our theme uses for site title styling (#masthead .site-branding .site-title a). You might notice that the theme uses the exact same selectors to style the site’s title, so why does our CSS override the theme’s styles? This happens because the “Typekit Fonts for WordPress” plugin defines its styles later (lower down on the page) than the styles in the theme’s default stylesheet. As this Stack Overflow answer explains, “When multiple rules of the same ‘specificity level’ exist, whichever one appears last wins.”
Whatever CSS you want to use should be added to the <head> of your site inside of a pair of <style> tags. If you’re using “Typekit Fonts for WordPress,” simply writing the CSS will work, as the plugin will automatically add <style> tags for you when it inserts the CSS into the <head>.
Once you’ve added your CSS, you can try viewing your site. If all is well you should see your shiny new web fonts applied to the desired text!
Prevent a Flash Of Unstyled Text (FOUT)
Since web fonts are loaded asynchronously your page will most likely be displayed before the Web fonts have finished loading. This can cause an aesthetic issue where the text briefly exists with a different font before it ‘flashes’ to the correct web font. Hence the term “Flash Of Unstyled Text” or FOUT.
A FOUT is generally undesirable, and Typekit offers you a solution with font events. Font events are simply CSS classes that are applied to the <html> tag your page by the Typekit embed code. They look like this:
.wp-loading
.wp-active
.wp-inactive
These classes allow you to choose how your text is displayed while the web font is loading, active or inactive (failed to load).
A good option is to simply hide your text until the web font has finished loading or has failed to load. For example, add the font events to the beginning of your CSS selectors like so, and you can prevent a FOUT:
.wp-loading #masthead .site-branding .site-title a {
    visibility: hidden; /*hide text while the web font is loading */
}
.wp-active #masthead .site-branding .site-title a,
.wp-inactive #masthead .site-branding .site-title a {
    font-family: "gnuolane", sans-serif;
    visibility: visible; /* show text if the web font is loaded or failed to load */
}
With CSS like this the text should wait to be displayed until the web font has loaded. A much more elegant solution.
All done!
With that you should now have your Typekit web fonts embedded in your site, applied to text, and the annoying Flash Of Unstyled Text should be permanently banished!
If you have any questions or comments about this article, please let us know in the comments.